

Candied caramel apples are so easy and an absolute necessity for the holidays. Make them for parties or even as gifts for your neighbors. They are delicious and you can use your creativity and make them fabulous. Simply buy a bag of caramels, (or make your own), melt them down with 2 tablespoons of water and stir until smooth. Coat the apples and let the excess drip off and place the apples on buttered wax paper. Decorate with candy, nuts and chocolate. Refrigerate to set.
31.10.08
Candied Caramel Apples
29.10.08
celebrate: a hogwart's halloween

Alright all you Harry Potter fans, we know you've all dreamed about what butterbeer actually tastes like. Well luckily, you don't have to be a witch or wizard to find out. Throughout the world wide web you'll find an array of recipes devout to J.K. Rowling's make believe beverage. You can even make it a Halloween tradition to try different recipes and eventually make up your own. Or, you can try our sweet tooth quenching version.
butterbeer
1 pint (2 cups) cream soda or apple cider
1 cup vanilla ice cream, softened
2 Tablespoons butter
2 Tablespoons brown sugar
dash of cinnamon and nutmeg
Place cream soda or apple cider in a microwave safe mug, and heat on high for about 3 minutes, or until very hot. While it's heating, mix together the vanilla ice cream, butter, brown sugar and cinnamon.
When the soda is hot, pour into a blender, add ice cream mixture, and pulse on high for about 5 seconds. Pour into individual mugs, and sprinkle a dash of nutmeg on top. Enjoy with some fresh apple chips, or another munchie, maybe some ton-tongue toffee?
Bottoms up!
Jj
28.10.08
recipe: halloween witch finger cookies

with halloween just around the corner, many of us are wondering what treat to bring to our next halloween party.
these creepy witch fingers are a hit with the little ones, and they love the idea of eating witches fingers. i even used mine as a cute prop for our halloween party invitations.
i went with an idea i got from martha stewart using a "reminder finger." but, instead of buying hers from martha stewart crafts, i made my own edible ones, and delivered them with the invitation in a white take out box. very creepy!
here's the recipe for the creepy witch fingers:
[adapted from this recipe and this recipe]
{witch finger cookies}
cookie ingredients
1 cup butter, softened
1 cup powdered sugar
1 cup creamy peanut butter
1 egg
1 teaspoon vanilla extract
2 3/4 cups all-purpose flour
1 teaspoon baking powder
1 teaspoon salt
1/2 cup sliced almonds
2 tablepoons icing glue (see below)
50 pretzel sticks [for the finger bone]
icing glue ingredients
1/4 cup powdered sugar
1 teaspoon water
directions
1. in a large mixing bowl, beat the butter until smooth and creamy.
2. add the sugar, egg, peanut butter and vanilla extract and mix well.
3. add the flour, baking powder, and salt and beat until completely mixed.
4. cover the dough and refrigerate for 30 minutes. [very important that they be chilled at least 30 minutes before baking so that they will keep their shape after they are baked.]
5. preheat the oven to 325°F.
6. with your hands, roll a heaping tablespoon of dough into a finger shape around a pretzel stick for each cookie. if the dough gets sticky and hard to work with, put it back in the refrigerator for a little while. Place fingers on an ungreased cookie sheet about 3 inches apart.
7. use a butter knife to make knuckle marks on the finger cookies. slightly flatten the front of the finger to create a nail.
8. bake 20-25 minutes, until fingers are slightly golden. remove from the oven and let cool. meanwhile, prepare the Icing Glue. mix together powdered sugar and water in a small bowl until the consistency is similar to that of a paste.
9. attach almond slice fingernails to the tips of the fingers with Icing Glue. Let glue dry for about 30 minutes.
makes about 50 cookies.
enjoy!
xoxo,
caroline "the curious cook"
27.10.08
recipe: easy pumpkin cupcakes
 Are you looking for a last minute recipe to take to that Halloween party this week? Baking doesn't have to be intimidating or hard - it can be as easy as adding to a cake mix! And pumpkin cupcakes are sure to please everyone this time of year! Frost with your favorite icing - I love cream cheese icing with pumpkin - and decorate with Halloween candy.
Quick and Easy Pumpkin Cupcakes
from VeryBestBaking.com
Makes 24 cupcakes
1 package spice cake mix
1 15 oz. can pure pumpkin
3 large eggs
1/3 cup vegetable oil
1/3 cup water
Preheat oven to 350F. Paper-line or grease 24 muffin cups.
Blend cake mix, pumpkin, eggs, oil and water in a large mixer bowl until moistened. Beat on medium speed for 2 minutes. Pour batter into prepared cups, filling evenly.
Bake for15-20 minutes, or until a wooden pick inserted in the center comes out clean. Cool in the pans on wire racks for 10 minutes, then remove to wire racks to cool completely.
26.10.08
test kitchen

 We had a successful week in the Zupas test kitchen.
Spiced Pumpkin Banana Soup: check
Butternut & Apple Curry Soup: check
White Bean & Chicken Chili: still tweaking
Unlike most restaurants, Zupas has an active test kitchen where new recipes are constantly being developed. It's fresh ingredients meets exotic spices and innovative ideas. Stay tuned for weekly updates on what we're cooking up in the Zupas test kitchen.
Look for our newest creations, Spiced Pumpkin Banana Soup & Butternut and Apple Curry, at all Zupas locations in November.


23.10.08
recipe: Pumpkin Spice Muffins
 These muffins are filled with fall spices and fill your home with the most wonderful, sweet, fall aroma! They are topped with a brown sugar cinnamon crumble and drizzled with a cinnamon cream cheese glaze. They are so moist and delicious you will be having seconds before you know it! These muffins will certainly warm your soul on a cold fall day.
Pumpkin Spice Muffins with Brown Sugar
Crumble and a Cinnamon Cream Cheese Drizzle
makes 12 muffins
For the muffins:
3 cups all purpose flour
1 1/2 tablespoons baking powder
1/2 teaspoon salt
1/2 teaspoon pumpkin pie spice
1 teaspoon ground cinnamon
1/2 cup butter, melted
1/2 cup sugar
1/2 cup brown sugar
2 eggs
1 teaspoon vanilla extract
1/4 cup milk
1/4 cup heavy cream
1 cup pureed pumpkin
For the Crumble:
1/4 cup brown sugar
2 tablespoons all purpose flour
1/2 teaspoon cinnamon
1 tablespoons melted butter
For the glaze:
1 cup confectioners' sugar
2 ounces softened cream cheese
dash of ground cinnamon
dash of milk, if needed
1. Preheat oven to 350 degrees. Spray regular muffin in with non stick spray.
2. Whisk together the flour, baking powder, salt, cinnamon, and pumpkin pie spice. Set aside.
3. Using a mixer, mix the butter and sugars until creamy. Add eggs and vanilla and mix until combined. Alternate adding the dry ingredients and the milk and cream. Add pumpkin puree. Do not overmix.
4. Divide batter evenly between the muffin tins, filling to the very top and a little over.
5. In a small bowl, mix together the ingredients for the crumble. Crumble on top of each muffin batter. Bake for about 25-30 minutes or until cooked through and lightly browned. Transfer to a wire rack to cool slightly.
6. In a small bowl, mix together the ingredients for the glaze. Drizzle over the tops of the muffins.
21.10.08
recipe: homemade marinara sauce
 i had a great harvest this year of garden tomatoes.
if you're lucky you still have some to harvest from your garden, or you canned them to enjoy all winter long. homemade marinara sauce is surprisingly easy to make and tastes better than any store bought sauce. and, it's a great way to get using all your tomatoes! this is great with your favorite pasta and meatballs, or for your next lasagna!
this recipe yields approximately 80 oz. some to eat with dinner tonight, and two freezer bags full to freeze for another time!
{homemade tomato marinara sauce}
adapted from this recipe
ingredients
5 1/2 lbs tomatoes, [fresh or canned]
12 ounces tomato paste
3 cloves garlic, whole un-peeled
1/2 onion peeled, [un-cut]
4 tablespoons olive oil
4 tablespoons parsley, dried or fresh
2 teaspoons oregano
2 teaspoons dried basil
3 teaspoons salt
1/2 teaspoon black pepper
1/2 teaspoon red pepper flakes [optional, if you like spicy]
3 tablespoons italian seasoning
3 tablespoons sugar
1/2 cup chicken broth
1/2 cup red wine [optional]
directions
heat oven to 350 degrees.
on a greased cookie sheet place tomatoes, halved cut side up. placed unpeeled garlic, and the 1/2 onion on sheet. drizzle with olive oil, and salt and pepper. place in oven uncovered to roast for 1 hour. cool 15 minutes on a rack.
after roasting, place tomatoes, garlic, and onions in blender in batches and process until smooth. run through a strainer/sieve to remove any un-wanted skin and peels.
add tomato mixture to a stock pot with remaining ingredients and simmer for 45 minutes, stirring occasionally.
enjoy!
xoxo,
caroline "the curious cook"
recipe: old fashioned apple butter
Apples are in abundance this season and apple butter is an easy recipe that takes little preparation, even less hands-on time, and lots of apples.
This recipe is from a vintage cookbook that had no given measurements, so you know the recipe is tried and true. Most of it is eyeballed and according to your own taste. So every time you make it, it'll be your best batch.
apple butter
making it the old fashioned way.
ingredients:
Fresh, unclarified apple juice (you know, the unpasteurized kind that's not great for little kids to drink; don't worry, we'll boil it down.)
a few pounds of yummy locally picked apples (depending on how much you're making)
cinnamon
nutmeg
cloves
allspice
cardamom
a little vanilla
any other spices you fancy, adore, and love
The best apples to use are: Jonathan, Winesap, Stayman, Golden Delicious, Maclntosh, or another tasty variety, just pick your favorite. :)
directions:
In a large stock pot bring the cider to a boil. Let it boil on medium heat until it's about half the amount you started with. This will assure that any bacteria (the reason little kids can't drink it raw) is killed.
Next; pare (that means peel), core and quarter your apples, then slice them up into thinner slices into a large crock pot.
After the juice is reduced, add it to the apples until they are just covered, reserving whatever juice may be left. You don't have to get rid of the sludgy looking stuff unless you prefer to.
Let the apples and juice sit, ruminate, boil and cook in the crock pot on high until it begins to boil. Reduce the heat to low and let it cook for 8-10 hours. After about 8 hours, check it every so often (half hour) to assure it's not burning. Or just start it in the evening and let it cook on low while you sleep. When you awake it'll likely be finished.
Take a fork and break up the apple pieces if they aren't already broken down as it cooks. When the butter gets to the consistency that you like, press the apples through a colander, food mill, strainer, or puree in a blender.
The consistency should be where if you spoon it there is no liquid separating from it and it stays "mounded", like butter. If it is too thick to your liking, add in more apple juice that's been boiled. Don't add in fresh apple juice, the bacteria hasn't been murdered yet, meaning it's not safe to can.
Now this is the fun part, add whatever and how ever much spices you like according to taste. "Goutez, goutez, goutez!" Try adding a little molasses, or if you want it sweeter, add honey. Although I doubt you'll need to. Go with your taste buds.
Pour the butter straight into quart jars if you want to store them in the fridge or process it to keep on the shelf for a year or two. You process the jars the same as you would do for any other type of jam, preserve, etc. For more info on canning, see here. If you do plan on canning the butter to store (at room temperature), make sure you leave a little bit of head room for the butter in the jars.
Enjoy it on toast, in a peanut butter sandwich or in a smoothie. I love it in my oatmeal. Use your imagination, follow your tummy.
Enjoy!
Jj
20.10.08
celebrate: Halloween
 With Halloween right around the corner, now is the time to get your kids involved in some Halloween fun!
These ghost cookies are really easy, and a great way to get your kids involved. All it takes are some Nutter Butter cookies, white candy coating or white chocolate chips, and chocolate chips.
Take your candy coating and melt it. You can either do this in a double boiler or in the microwave at 50% power, making sure to check it every 30 seconds. Simply dip the cookies in the melted coating and set on a sheet of waxed paper to dry. Before the coating is dry, adhere the chocolate chips for eyes. To create the mouths, simply melt some chocolate chips in a ziplock bag, snip the corner with some scissors, and decorate away!
19.10.08
destination: NYC
 I ventured to NYC this week for food business and made the most of eating my way through the city in 4 short days. A good friend and mentor took me to a restaurant he recently invested in and to put it plainly, the experience didn't dissapoint. Nestled on a small street corner in the West Village, this quaint yet cool eatery seemed to capture the charm of NYC in a very "barnyard chic" fashion. I enjoyed a delicious Sangria Marinated Hanger Steak and French Fries (done right) dipped in a tangy cocktail sauce. The real star was my appetizer, Bacon Wrapped Scallops with Grits. Words couldn't possibly do this dish justice.
 My quick trip to New York also included an hour long visit to Dean & Deluca, Bouchon Bakery, and Pizza from Ray's. Once again, NYC has manifested to me that whether it's an eclectic sangria hanger steak, a simple slice of pizza, or a delicate pastry, this city is full of fabulous food.
15.10.08
recipe: chicken tikka masala
 one of my favorite types of food to eat is indian food.
i love the beautiful variety of spices they use in their cooking, and the combination of flavors is always a delight.
my favorite indian dish, hands down is chicken tikka masala.
i love trying to re-create dishes from my favorite restaurants at home. of course my curiosity got the better of me, and i've been working to make my chicken tikka masala rival some of my favorite indian restaurants. and, i think i've just about got it! i've been perfecting this recipe for years, making little changes here and there. so, i am excited to share it with you!
{chicken tikka masala}
*pick up indian spices at your local indian grocery store.
ingredients
chicken marinade
2 lbs boneless skinless chicken breast, chopped i cubes about 1 inch
1 inch ginger root, finely grated or chopped
2 cloves garlic, finely grated or chopped
1/4 tsp turmeric powder
1/4 tsp cayenne pepper powder
2 tbs tandoori masala mix [i use rajah brand]
1/2 cup plain yogurt
1/2 tsp kosher salt
directions
mix all the marinade ingredients with chicken, and marinade at least 2-24 hours in fridge.
preheat oven to 400 degrees f.
 lay marinated chicken out on a sprayed or lined cookie sheet.
 add the tomato puree and diced tomatoes.
 add the ground coriander, cumin, garam masala, salt, cayenne pepper, brown sugar, and tumeric. fry for another minute.
 the chicken should be baked by now.
 add the baked chicken along with any juices from the sheet to the mixture along with the heavy cream and water.
 remove from heat and add cilantro [reserve some for garnish], butter, and lemon juice.
enjoy!
ingredients
chicken marinade
2 lbs boneless skinless chicken breast, chopped i cubes about 1 inch
1 inch ginger root, finely grated or chopped
2 cloves garlic, finely grated or chopped
1/4 tsp turmeric powder
1/4 tsp cayenne pepper powder
2 tbs tandoori masala mix [i use rajah brand]
1/2 cup plain yogurt
1/2 tsp kosher salt
directions
mix all the marinade ingredients with chicken, and marinade at least 2-24 hours in fridge.
preheat oven to 400 degrees f.
lay marinated chicken out on a sprayed or lined cookie sheet.place in oven, and bake for 20-25 minutes.
ingredients for gravy
1/3 cup oil [light canola or vegetable]
2 bay leaves
4 green cardamom pods
4 whole black pepper corns
4 whole cloves
3 inch cinnamon stick
1 red onion, finely diced
1/2 green pepper, seeded and diced
1 inch ginger root, peeled and grated or finely chopped
3 cloves garlic, grated or finely chopped
1 [10 3/4 oz] can, or 1 1/4 cup of tomato puree
1 [10 3/4 oz] can of diced tomatoes, cut up very small
1 tbs ground coriander
1/2 tbs ground cumin
1 1/2 tbs garam masala mix [rajah brand]
1/4 tsp ground cayenne pepper
1/4 tsp turmeric
1 1/2 tsp kosher salt
1 tbs brown sugar
half-pint [1 cup] heavy whipping cream
1 cup water
2 tbs butter
8-10 sprigs of fresh cilantro chopped
1 tbs fresh lemon juice
directions
while the chicken is baking, make the gravy.
heat 1/3 cup of oil in a non-stick heavy bottom stock pot over medium heat.
after the oil is heated, add the bay leaves, cardamoms, cloves, cinnamon stick, and peppercorns.  cook for about 30 seconds.
cook for about 30 seconds.add onions and green peppers and fry until onions get translucent. about 10 minutes.
then add ginger and garlic and fry for another couple of minutes.
add the tomato puree and diced tomatoes.cook this mixture for another 10-15 minutes, stirring continuously until oil appears on the surface.
add the ground coriander, cumin, garam masala, salt, cayenne pepper, brown sugar, and tumeric. fry for another minute.the chicken should be baked by now.add the baked chicken along with any juices from the sheet to the mixture along with the heavy cream and water.mix well and bring to a boil, then simmer for 10 minutes until the chicken is cooked through.
taste for seasonings.
remove from heat and add cilantro [reserve some for garnish], butter, and lemon juice. mix well.
check the thickness of the sauce. add water to make sauce thinner if desired.
serve with hot basmati or jasmine rice.
enjoy!xoxo,
caroline, "the curious cook"
How To: Roast Pumpkin Seeds

Pumpkins bring us so many wonderful things during the Fall season. Jack-o-lanterns, pumpkin soup, pumpkin bread, and my favorite pumpkin seeds, are just a few. Roasting pumpkin seeds is so simple and takes just a little bit of time to clean the seeds, and just about an hour to roast them. They are a simple little treat! So after you've carved your pumpkins, make sure you don't let those seeds go to waste.
How To: Roast Pumpkin Seeds
1. Get a nice ripe pumpkin.
2. Cut the top off. Using a sharp spoon, get all the seeds out and place them in a large bowl filled with water. In doing this, the seeds will all rise to the top of the water and make it easier to get the seeds away from the pulp.
3. Clean the seeds and make sure all the pulp is washed away.
4. Place clean seeds in a bowl. Add vegetable oil to the seeds and mix well. For every 1 cup of seeds use 1 tablespoon oil.
5. Pour seeds onto a large cookie sheet lined with parchment paper. Make sure there is just a
single layer of seeds on the pan.
6. Sprinkle seeds with salt. For every 1 cup of seeds use 1/2 teaspoon salt.
7. Bake in a 250 degree oven for about 1 hour, or until dry and lightly golden brown.
in season: winter squash
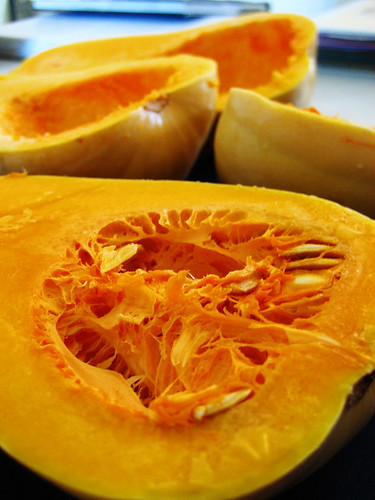
There are numerous types of produce that are in season during October, being the reason they call it the "harvest" I suppose. One specific type that is grown locally, and in abundance, are winter squash - butternut, butter cup, turban, pumpkins, and spaghetti to name only a few. They can be roasted, baked, fried, pureed, used in appetizers, as main dishes and in all kinds of desserts. They are also uniquely an American vegetable as they are native to the American continents. So show your patriotism and visit a local farmer to pick up a few. Here's one of my favorite ways to eat butternut squash, in Roasted Garlic and Butternut Squash Soup. Warms the heart and toes.
To bake any winter squash simply cut the squash in half symmetrically, remove seeds and such, drizzle a little olive oil on the flesh and bake, flesh side down, for at least 45 minutes (depending on the size) in a 350 degree oven; or until tender and soft. Remove the flesh from the rind and use however you fancy. The possibilities are endless!
Jj
14.10.08
Recipe: “Warm You Up” Chili
 Did you know that October is National Chili Month? And what better way is there to welcome in the cooler weather than with ah steaming bowl of chili and a side of cornbread? This chili should have you ready to face the cooler temperatures!
"Warm You Up" Chili
4 slices bacon, chopped
1 large onion, diced
2 garlic cloves, minced
1 jalepeño, seeds and membranes removed, finely diced
1 1/2 pounds ground beef
12-oz. beef broth
1/2 teaspoon salt
1/2 teaspoon ground pepper
1 1/2 tablespoons chili powder
1 tablespoon hot sauce (such as Frank's Red Hot)
2 teaspoons Worcestershire sauce
1/4 teaspoon ground cumin
1 (14 1/2 ounce) can diced tomatoes, undrained
1 (8 ounce) can tomato sauce
1 (15 ounce) can kidney beans, drained and rinsed
Shredded cheddar cheese and sour cream to serve
Cook the bacon in a large pot over medium heat until browned. Remove half of the bacon grease and discard. Add the onion and cook until translucent. Add in garlic and jalepeño and cook for 1 minute.
Add in ground beef and cook until browned, stirring to crumble. Add in beef broth; cook until liquid is reduced by about two-thirds. Stir in salt, pepper, chili powder, hot sauce, Worcestershire sauce, cumin, tomatoes and tomato sauce. Cover; reduce heat to medium-low and simmer for about 30 minutes - until mixture thickens. Stir in the kidney beans and cook until the beans are warmed through - about 10 minutes.
Serve with shredded cheddar cheese and sour cream, if desired.
Subscribe to:
Posts (Atom)
